Pages

Wednesday, December 31, 2014

Fun Notion Storage

Hi this is Jenifer here with you today with one of my first posts for Love My Fabrics.  I have so many projects ready to share with you and I can't wait to get started.  But as we patiently wait for fabric to arrive we have been asked to show how we store our Fabric and Notions.

Well I am pretty spoiled and I came across this beauty several years ago and with a little elbow grease and some sandpaper and finish I have it plum full of thread, needles, velcro, zippers and really anything you could think of.
On the top I have my embroidery threads and some large jars of buttons.  I highly recommend if you ever come across one of these at a reasonable price then snatch it up.  These 60 drawers hold endless treasures.
Thank you so much for stopping by today, leave me a link I would love to see how you store your notions.
Jenifer

Tuesday, December 30, 2014

My Fabric Storage

Hey everyone, Tabatha here! Today I wanted to show how I organize and store all of my fabrics. I like to store my fabric by color. I find that it helps me group fabrics for a quilt faster if the fabric is already sorted by color.


I keep scraps for scrap projects or quilts in plastic bins. They are sorted by color/size. For example I have a lot of 5” squares so they are in buckets labeled 5” squares and what color they are.  I also have buckets of colors /strips. This makes it super convenient to grab a bucket of strips and make color coordinated projects.


For larger pieces I wrap my fabric around comic book boards and line them up like miniature bolts on the shelf. I do have a few larger pieces that won’t conveniently fit on the shelf and they usually end up in a larger bin in the closet for when I need a quilt backing.


Katie has some smaller pieces of fabric and fat quarters that she keeps all lined up in an old coke crate she found at a flea market.


How do you organize your fabrics?

Monday, December 29, 2014

Easy Peasy Fabric Storage Tips!

Hi there fabric lovers!
Rachelle here with my first post for

Today I want to share a few
easy peasy tips to store your fabrics.
I use to love creating all sorts of thing on the sewing machine.
These days I love using fabric to create
 scrapbooking, cards,altered art, and mixed media projects.
Here are the tips:

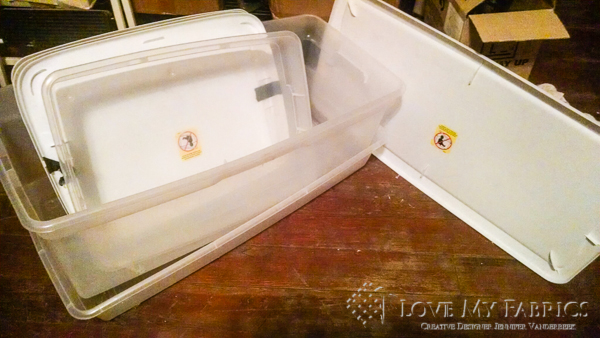
Iris 12x12 Scrapbook Storage Case

(1) I so love the Iris scrapbook case especially when they
are on sale at Michael's.
The lowest cost was $2.99. What a deal!!!!
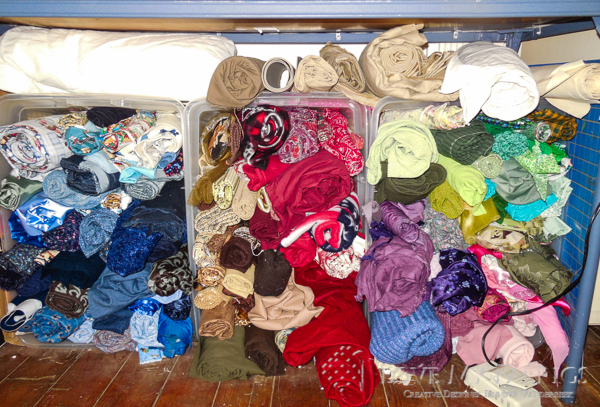
This popular 12x12 storage case comes in various colors
and holds large quantities of fabric; saving space.


(2) This case holds my burlap and canvas fabric. The smaller yards 
are folded tied with ribbon.

(3) Notice the plastic bags which I use for smaller yards.
I saved these from product packaging which 
is great to reuse for organization and storage.
So always check packaging before tossing it away!


Also, If you have labels they are awesome to use on storage items.


(5) As you can see this case is perfect for larger yards of fabric.
There is another plastic bag which has snaps for easy closing that remains locked.

So there you have it!
Easy peasy tips I hope you will use.

Thanks so much for stopping by! Be sure to check back for more!
See Ya Soon!
Huggies!!!

Sunday, December 28, 2014

Applique Fun


Don't you love this sweet mug?  I fell in love the with the colors and pattern of the flower and want to make a mug rug to go along with it.  Today I am going to do a tutorial to show you how easy it is to mirror the pattern that you like and want to replicate. 
I usually head over to Google Images and find something that I like.  I picked these two flower shapes and copied them into a word document and printed it out.
Next I got my light board out and put the pattern piece on top of the light board.  I decided to use the flower on the right for my applique.
I placed the flower template on top of the light board and then put my fusible interfacing on top of it with the grooved side that you iron on down and the smooth side up.  I traced the flower and it is now ready to be ironed onto the back of my fabric.  I would probably make a few more of these to use in my project.  Once your iron it on you peel off the backing and iron it down onto your fabric.  Follow the instructions on your fusible interfacing for the ironing part.  I usually trim around pretty close to my drawn lines so that I waste as little fabric as possible.

Keep following the blog because I will likely finish this project up and show you how it came out.  I will also share my favorite technique for machine applique.
Hugs,
Anita


Saturday, December 27, 2014

Front and Center Fabric Storage

Hey there, fabric fans! Jenn, here, to show you how I flip the addage 'out of sight, out of mind' into 'into sight, into projects'!


The sewing section in The Abyss
Years ago I inherited a small chest of drawers that my younger brothers had outgrown, and before long I started calling it the Bureau of Fabric because it was a great way to keep my fabric stash contained, even if the insides weren't as neat and tidy as they could have been.

I've since grown out of those 4 drawers into multiple totes--and I keep buying more. Since small projects are my forte, I love hitting up the remnants bins at the craft stores for a few more treasures each trip. In other words: my stash had become a bit unwieldy.

So, the other night, I decided it was time to tame the fabric beast, get rid of all the too-small pieces that were cluttering up the Bureau, and reorganize the usable fabrics that were left.

Inspired both by the way the remnants are rolled when I buy them as well as the practice of rolling clothes for packing to fit more in smaller spaces, I folded then rolled each piece of fabric and piled them all up.

I'm a fabric-dragon, and this is my hoard. Out of curiosity I measured: this is ~22 cubic feet of fabric.

Then it was time to add some order to the chaos and, for me, color is my organizing preference: whether it's paper, embellishments, the clothes in my closet, or the fabrics in my studio, I create by color so I group my supplies by color.

Sometimes vertical is the only way to go!
To keep all my fabrics accessible, I stood most of them upright in three plastic totes, this way nothing is buried at the bottom and I don't have to dig around as much. Limited floor space leads to stacking (which defeats the purpose of accessibility) so instead I stood 3 totes up under my sewing table (a 2'x4' folding table), with larger rolls and a few full bolts stacked on top.

The Bureau of Fabric lives!
Not everything could fit in the upright totes, though, and the lighter colors maybe wouldn't do as well in open storage as the darker patterns. Those items went back into the chest of drawers but I they're not packed so deep as to make finding things impossible.

Oooh, room for more stuff!
This is a great example of how reorganizing saves space: I was able to empty out several totes and it wasn't because I discarded a lot of scraps, it was just a better use of space! 

Having my fabric visible from pretty much anywhere in my studio means I'm way more likely to use it in projects. Organizing it this way means I can get to anything without any trouble. And getting it all organized is a great way to start off the upcoming year!

Wishing you creative days,

Thursday, December 25, 2014

Introducing DT Coordinator & SMM Kimberly Congdon

Hi I am Kimberly Congdon, aka: Scrap It Girl.  I hope you were able to check out the other creative designers as they introduced themselves earlier this month.  When time go back through their posts and check out their blogs. 

Starting in a few days our designers will start sharing their favorite sewing tips, favorite notions, and favorite ways to organize their fabrics.  Once our designers receive the fabrics they ordered they will start designing and sharing what they make.. we are hoping by the end of January~ 

Kimberly Congdon
DT Creative Designer,
DT Coordinator & SMM
Scrap It GirlFacebook, Instagram

My position is simple, I am the DT coordinator and SMM for Love My Fabrics.  I prefer the non sewing projects!  I mainly use my fabrics in my layouts and home décor projects.. but my sewing machine is ready to go. 

Here are 2 lamp shades I recently made using a variety of fabrics. These are just tie lamp shades.. no sewing skills were needed. 


Sorry our blog presence has been quiet we were taking a blogging break as we were all getting ready for the holidays.

I will be having another sponsored giveaway soon on my blog so make sure you follow me.. I will be giving away a collection of fabrics from Love My Fabrics.

See you soon!
Kimberly
DT Coordinator & SMM for Love My Fabrics

Sunday, December 7, 2014

Introducing Jenny Johnson


Hi Everybody!
My name is Jenny, or better known as Crazy About Cricut.  


I am super excited to be joining the Love My Fabrics design team!  While I'm mostly a papercrafter, I like adding fabric to my designs to give them some fun dimension and texture.  Here's a card I created using some fun fabric strips:


Isn't that so fun??  I can't wait to share projects created using the gorgeous fabrics from Love My Fabrics!  

You can check out more of my designs on my blog HERE, chat with me on Facebook HERE, and see my video's on YouTube HERE.  TFL, and hope everyone has a chance to craft today :)

Saturday, December 6, 2014

Introducing Steph Ackerman

Hi everyone.   My name is Steph Ackerman and I am so excited to be a part of the Love My Fabrics Creative Team.   I live on Long Island (New York) with my husband of 34 years and our 19 year old son. 


I have been creating in some form since I was a child- everything from sewing to crochet to paper crafts and more.  My great grandmother gave me my first sewing machine and I started making my own clothes in my early teens.  While I no longer make clothes, I add fabric to my paper crafting projects and often sew on my paper projects.  

My passion is card making and mixed media projects, but I have my hands in a lot of different areas!!!  I love the creative process and can be found daily in my craft room working on a variety of projects. 

This is a sample of one of my cards using inks and embossing.


A bandana for my pup using assorted colors of Izink!


I love incorporating a wide variety of elements in my projects and I can't wait to start working with the gorgeous fabrics from Love My Fabrics.

My blog: http://www.stephaniescraps.blogspot.com/
Facebook:  https://www.facebook.com/steph.ackerman1
Pinterest:  http://www.pinterest.com/stephackerman/


Thanks for stopping by today.

Steph


Thursday, December 4, 2014

Introducing : Jenifer Cowles

Hi my name is Jenifer, and I am so excited to be a part of this team and to work with some beautiful fabrics.  I am pretty well rounded and can sew everything from garments, quits, dolls and paper.  I have been sewing for about 25 years and just wish there were just more time in the day to get everything done.  These are just a few of my projects, if your interested stop by my blog and check out some of my other hobbies, including scrapbooking, stamping and crafting you just never know what your going to get when you stop by.


Leave me a comment and let me know what projects you would like to see, 
Have a wonderful Holiday Season,
Jenifer


Wednesday, December 3, 2014

Introducing: Tessa Buys

Hello! My name is Tessa Buys and I love to make pretty things.


I am mostly a paper crafter, but I spend just as much time drooling over bolts of fabric as I do sheets of patterned paper. I have been selling handmade fabric flower accessories in my Etsy shop, Precocious Paper, for several years.


I was blessed with a baby girl this year (after three boys!), and now I spend quite a bit of time creating hair clips, headbands, and nursery decor for Adlyn.


I am excited to be a part of this new team for Love My Fabrics and can't wait to get started! Please feel free to follow me on Facebook or say hi on instagram. Learn more about me at my blog here. Have a great day!

blog: http://precociouspaper.blogspot.com/
facebook: https://www.facebook.com/precociouspaper
instagram: http://instagram.com/precocioustessa
you-tube channel: https://www.youtube.com/user/precociouspaper

Tuesday, December 2, 2014

Introducing: Julie Kelley

Hi Everyone,
I'm Julie Kelley, and am thrilled to be a part of the wonderful and talented Love My Fabrics Creative Team! I'm a teacher in MA, and live with my husband and 2 children. I spend most of my evenings driving the kids around to their various activities and crafting! I love fabric, yarn, paper... I'm pretty sure there's never been a craft that I didn't want to try! Here's a few of my more recent fabric projects, I can't wait to start posting projects with the new fabrics!

This is my daughter as "Louisa May Alcott" I made the skirt from a sheet, and added ruffles and lace to an old school shirt...

 This is me with the queen size quilt I made for my wonderful in-laws for their 50th wedding anniversary this fall... It used exactly 50 different fabrics!
This is my daughter as Queen Elizabeth (they do a LOT of character book reports!!). An old dress (on top) with a long skirt and cape that I made.
 And a recent baby quilt!
You can find me online:
my blog: www.juliek.org
twitter: @juliekcrafts

Monday, December 1, 2014

Creative Team Designer Announcement - Rachelle Green

Hi everyone. I'm excited to introduce myself as one of the Love My Fabric Creative Design Team -- Rachelle Green. Pronounced like "Michelle" but with an R and not to be confused with Rachel Green from Friends. LOL.

I started sewing when I was ten years old and don't remember a time in my life when I didn't sew. As an adult, I have always had a designated sewing room. My passion has always been garment sewing. I make 99% of my wardrobe including bras and coats. I always sew with a pattern and consider myself an expert in pattern alterations. I lean toward vibrant colors and classic styles. Take a peek into my closet...


I look forward to sharing garments with you made with the wonderful fabrics available from Love My Fabrics. You can follow me on social media at:

Blogger - Smoking Needles
Facebook - RachelleGreen
Instagram - rmoffettgreen
Pinterest - Rachelle Green